Introduction
I have a confession to make: I love buying used lenses. Sometimes it's the only option, for example with older AF or AIS lenses - by the way, you can still get a new Nikon Nikkor 50mm f/1.2 AIS, so grab one while the stock lasts. Another reason - the primary one - is that they're much cheaper than the new ones.
Of course, the issue is: How to make sure the used lens I'm buying is in good condition? Especially for beginners or not very experienced camera owners, buying a used lens can feel intimidating. What if it's broken? What if there's a small flaw that will reveal itself only later? How to check, since I'm so inexperienced that I don't even know what I'm looking for? Well, fear not: Amateur Nikon to the rescue! In today's article I'll offer you a detailed list with the things you need to check when you receive your lens, to make sure it's in good condition.
Note:
Perhaps you are interested in a lens that does have a small flaw that is already known (i.e. the seller is upfront about it), and you are wondering whether it would be a big deal or not. This article might be useful in such cases.
1. Exterior Body Check
Make sure there are no cracks on the case, on the mount, or on the filter thread. The electronic contacts on the mount (see picture below) should be clean, without any oxidization or other problems.
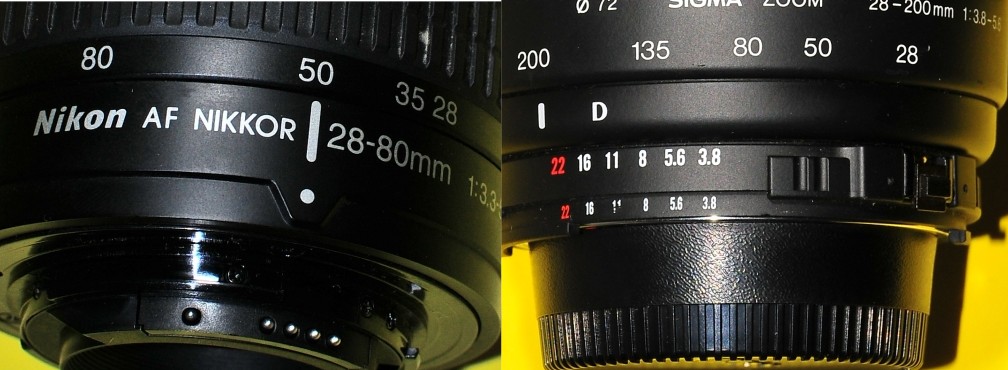 |
| See those 1+4 metal little balls on the lens on the left? These are the electronic contacts (in modern lenses there are more). |
2. Optics Check
Hold the lens against a light bulb and look through (position the lens and your eyes in a way that, although plenty of light passes through, you don't see the light bulb). The aperture must be open: if there is an aperture ring, turn it so that it's fully open; if it's a G-type lens, simply use your finger to pull the little metallic pin on the mount (see picture below)
When the optics of the lens are visible, look for flaws. Dust can be safely disregarded - all lenses have dust, and it does not affect image quality. Things you should be concerned about are chips, cracks, (deep) scratches, or fungus. The beginning of fungus looks like a snowflake or a small point with a bit of halo around it. In more serious cases, it's like a network of threads. The rule of thumb is: if you can't see anything other than dust when held under the light, the lens is fine.
If the lens has VR, test that too. Take a few photos at a shutter speed lower than the 1/focal length rule (= if e.g. the focal length is 85mm, take a few photos with shutter speed 1/40 or 1/20. They should be sharp with VR on, a bit blurry with VR off). VR makes all kinds of noise - they vary from lens to lens. As long as it's consistent (i.e. the same every time you press the shutter button), it's no cause for alarm.
Find a textured but flat and even surface - such as wallpaper on a wall. Take a photo (make sure the exposure is such that can give you a sharp picture) and then examine the image. In normal conditions, the far left side of the frame should be about as sharp as the far right. The center might be sharper, that's normal. Word of Warning: It's perfectly normal (especially in cheaper lenses) for the far sides to not be too sharp (depending on several factors). We're not testing that right now, the idea is that the far left and the far right are similar. If they are similarly not too sharp, so be it.
 |
| On G-type lenses, pulling this pin will open the aperture. |
When the optics of the lens are visible, look for flaws. Dust can be safely disregarded - all lenses have dust, and it does not affect image quality. Things you should be concerned about are chips, cracks, (deep) scratches, or fungus. The beginning of fungus looks like a snowflake or a small point with a bit of halo around it. In more serious cases, it's like a network of threads. The rule of thumb is: if you can't see anything other than dust when held under the light, the lens is fine.
3. Mechanical Check
Mount the lens onto your camera and test its operation. Ideally, be outdoors on a bright day. Make sure the autofocus behaves normally (both in acquiring focus and in that there are no abnormal noises - such as squealing). The pictures should look in focus, and over all as you expected them to be. Don't be preoccupied with things such as sharpness right now (we'll deal with this in a moment). If you're testing a manual focus lens, take a few pictures at several distances (from near to infinity), and make sure the photos are in focus.If the lens has VR, test that too. Take a few photos at a shutter speed lower than the 1/focal length rule (= if e.g. the focal length is 85mm, take a few photos with shutter speed 1/40 or 1/20. They should be sharp with VR on, a bit blurry with VR off). VR makes all kinds of noise - they vary from lens to lens. As long as it's consistent (i.e. the same every time you press the shutter button), it's no cause for alarm.
4. Advanced Checks: Consistent Sharpness across the Frame
This is something most users would not bother with, but if you're concerned about it, go for it - it's easy. With this test we're making sure there isn't (excessive) decentering of the lens. In other words, we're making sure there isn't an excessive difference between the left and the right side of the frame.Find a textured but flat and even surface - such as wallpaper on a wall. Take a photo (make sure the exposure is such that can give you a sharp picture) and then examine the image. In normal conditions, the far left side of the frame should be about as sharp as the far right. The center might be sharper, that's normal. Word of Warning: It's perfectly normal (especially in cheaper lenses) for the far sides to not be too sharp (depending on several factors). We're not testing that right now, the idea is that the far left and the far right are similar. If they are similarly not too sharp, so be it.

No comments:
Post a Comment