So, without further delay, here are 5 tips to get you successful real estate photos.
1) It's all about showing the best and camouflaging the not-so-great
Having said that, remember what I mentioned above: you can't be dishonest. So, no, you can't e.g. use Photoshop to clone out a hole in a wall. But you can "help" the living room look as spacious as it can be, with the proper tools. Focal length choice is crucial here. Get an ultra-wide lens (for DX users your best option in terms of value is the Sigma 10-20mm; for FX the Samyang/Rokinon 14mm f/2.8) that you can use to have control of the perspective (read tip #5 for important information regarding wide-angle), in that you can enhance the length of a long room. A more compressed perspective - i.e. using a longer focal length - can be shown to draw attention to details, isolating the subject.
2) Composition concerns: remove clutter
No, I don't mean clutter from the room (that's a given!) but from your composition. If you want to convey how spacious a room is, don't position your camera in a way that a large object is on the foreground. For instance, avoid shooting a bathroom with the door ajar, covering part of the frame. Avoid conflicting lines - e.g. a (vertical) curtain intersecting in the frame with a (horizontal) table.
3) Get your colors right (with some... creative ambiguity)
Remember what I said in the first paragraph? Real estate photography is a bit like product photography. And, as with taking photos of items, taking photos of houses and apartments means you should try to get the colors as close to reality as possible. A white wall should look white, not bluish. Having said that, "reality" is a fluid concept. Take a look at my articles on Photoshopping and Reality and Grey Cards. A white wall isn't white if it's lit by a late afternoon sunlight.
 |
| This is what you get by setting the White Balance with the help of a grey card (or the wall) |
 |
| This is what the scene really looked like (to the human eye, anyway), and what you get by setting "Daylight" as White Balance |
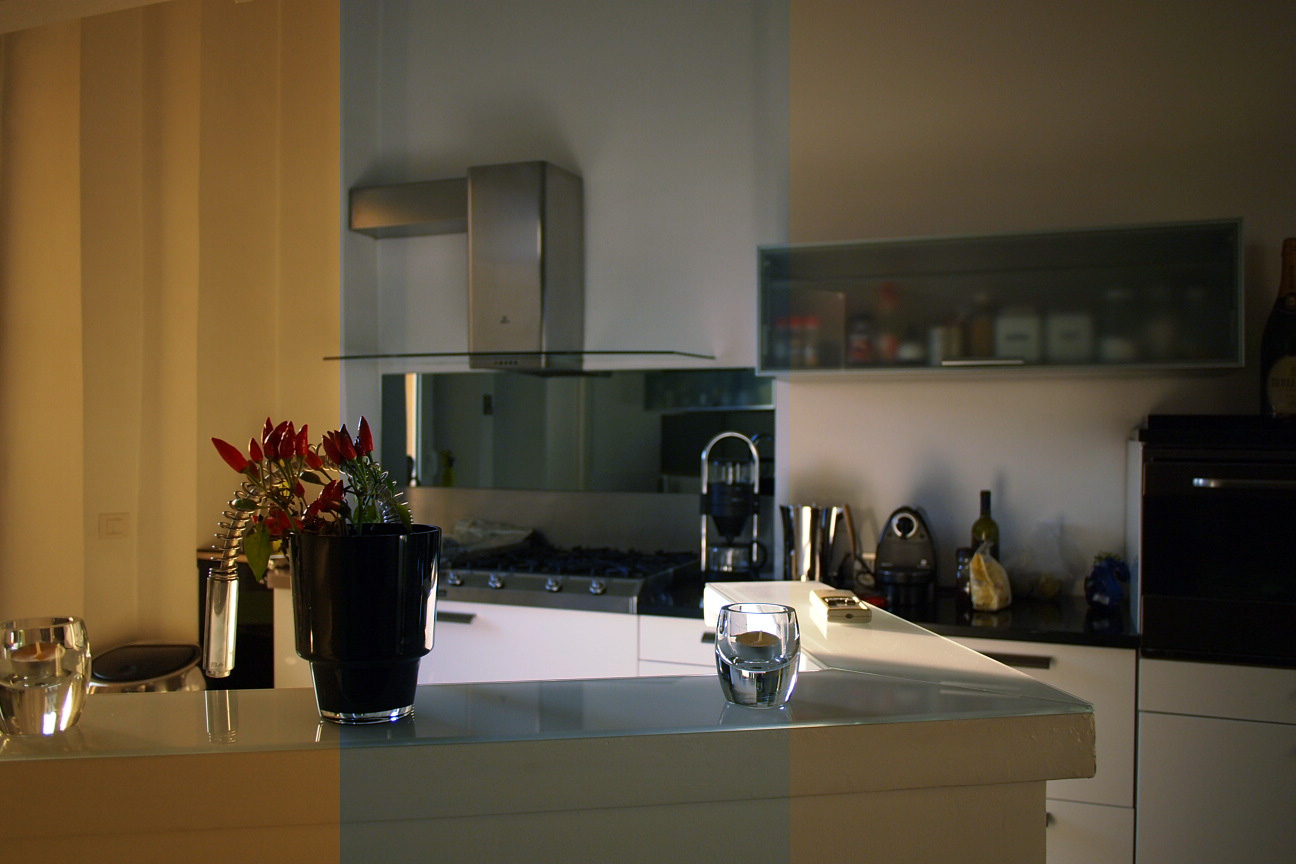 |
| Three different White Balance settings. The left is too warm, the middle is too cool, and the right is...well, about right. |
4) Choose the right time
Taking photos of real estate properties is far easier than chasing a sunset in the Grand Canyon. You can drive there whichever time you want, so pick a time that the light helps the composition. Avoid noon for outdoor shots; not only is the light temperature unflattering (i.e. it will give you boring colors), it will also create harsh contrasts that will make the situation even worse. Depending on the direction of the house, pick either early morning or late evening - a bit after sunrise or before sunset are ideal. For interior shots, pick times that would allow you plenty of ambient light - although, ideally, not direct sunlight. In some occasions, working with artificial light will be preferable - if, for instance, there are beautiful led lights installed in the kitchen, you'll want to show that.
5) Tips for real-estate photography with wide-angle lenses
As mentioned in tip #1, focal length choice is critical for controlling perspective. But using ultrawide lenses requires a lot of practice and knowledge about certain things. The most important thing to know is this: distortion is something to be aware of. There are two kinds of distortions involved. The first is the "natural" distortion due to the short focal length - this is the perspective control we talked about: things in the foreground look bigger/closer than they really are, things in the background look smaller/farther. This you can use to your advantage, as we said, for instance showing how long a living room is. But it can also lead to some unforeseen consequences, particularly if you tilt the lens. All kinds of crazy things can happen with lines in the frame, so be sure the composition works. Try to keep the camera level, and have lines in the frame disappearing into distance (so, placed in a diagonal).
The second kind of distortion is the so-called "waviness". That's a matter of lens choice. The options I gave you above, in tip #1 are quite wavy, which means you should avoid shooting straight lens across the frame. If that is expected, you'll have to pick a much more expensive lens, with less such distortion.

No comments:
Post a Comment