All these are past now, because manipulating the RAW file can give you any color you need even after the photo is taken. You can even experiment with White Balance to see how different settings affect the mood of the photo.
But what happens if you don't have the RAW file? What if the only thing you've got is the JPEG? The latitude of corrections is much less then, but there are still things left to be done. Today I'll show you how to achieve that.
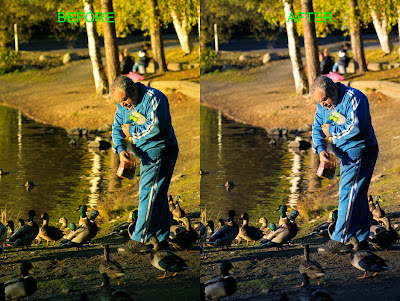
The image we want to correct is this:
 |
| There is an obvious greenish tint on this image |
The obvious first step is to identify the problem. That is, to see in which way the color is "off". If there are areas in the image that you know to be white, you're in luck. Use the Color Sampler Tool and place two or three on the white area. On this specific image, I pick the white stripes on the man's clothes. Then, clicking on the 'Info' palette, you can see the RGB values. Here's what we get from this specific image:
We would expect the individual R, G, B values to be approximately the same for an image without a color cast (in other words: for an image where the area we expect to be white, to actually be white). From the table, we see that the blues...got the blues. The 'B' is less by about 30-40 units. We need to create a Curves Adjustment Layer and lift the Blue Channel until the three channels are more balanced.
Now the numbers on the 'Info' palette are more balanced and the image seems very significantly improved!
But what if there are no areas that you know or at least could guess they could be white? Then things are much more complex. The procedure is the same in the use of the Curves Adjustment Layer, but what you will be lacking is the reference. You could try to visually detect/guess if a color seems to be overwhelming the rest. For instance, in our example image it's easy to spot that there is a green cast, even without the help of the Color Sampler Tool. Other cases might be more complex. If you have an image taken from the same area (and in the same lighting conditions) that appears to be correct, you could use the Color Sampler Tool to take references from that other image. That is, place your reference points on an area of the "correct" image (i.e. the sky or other even surface), then place reference points on the corresponding area of the problematic image. Adjusting the curves, try to get similar values for both images.


No comments:
Post a Comment