
- Open the picture you plan to use. Duplicate the layer (CTRL + J)
- From menu "Image" > Apply Image, and use the parameters for channel and blending mode shown on this photo:
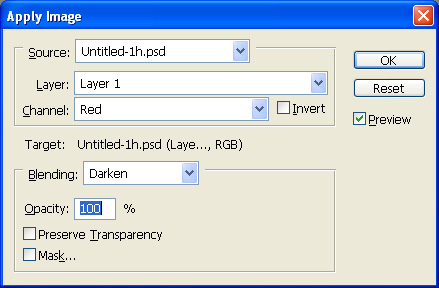
3. After clicking OK on the dialogue above, you will see an image with the blue parts of the picture (i.e. the sky) looking grey. Change the layer blending mode to 'Difference'. Stamp the visible layers (Press CTLR+SHIFT+ALT+E simultaneously). Select all (CTLR+A), copy (CTRL+C)
4. Now you can delete this top layer. You're back to having two layers, the top of which has 'Difference' as blending mode. Change it to "Luminosity". You will notice the sky appears much darker. Once more, stamp the visible layers (CTLR+SHIFT+ALT+E)
5. Go to the channels tab, and click the small icon on the bottom of the palette to create a new channel. There, paste (CTRL+V). You can hit CTRL+D to remove the selection.
6. Now, you must adjust the contrast a bit on this channel. Hit CTRL+L to bring up the levels dialogue, then adjust the sliders to increase the contrast between white and dark areas. Feel free to experiment.
7. Back to the layers palette, hit CTRL+J to duplicate the layer. From the menu "Select" > Load Selection, and from the 'channel' tab, select your Alpha (custom) channel, the one you just edited.
8. Add a layer mask (from the menu or simply press the appropriate button on the bottom of the layer palette).
9. Final step: From the menu "Filter" > Blur > Gaussian Blur, and experiment with a value between 2-5, according to taste
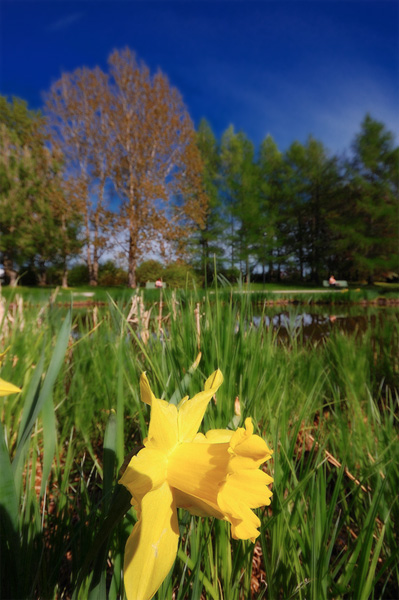
This is how the final result looks like - notice the 3D-like effect between the background and the grass blades in the foreground:

No comments:
Post a Comment